Most library systems have a requirement for an alternative view of the budget structure used by the Acquisitions department. The system normally has a number of budgets used by the Acquisitions department when ordering items for each library but the account numbers and / or account codes are not necessarily the same as those used by the Finance Office. There is normally a link between the codes used by the library and those referred to by the Finance Office. This link is then used to associate the correct codes used by each department with all order and payment details on each system.
· Each budget used by the library system is able to hold a code to be used as a link to an external financial system. You can create a fiscal list record to associate a number of library budgets with a specific account number from the external accounting office.
· Each fiscal list may contain a number of budget records but each budget record must only belong to a single list.
· The identifier for a fiscal list can be anything unique. You can set up one Fiscal list for each of the fiscal system codes used by your external accounting system.
· For example, set up a Fiscal list with an identifier of “Books” and another for “Serials”. Once you associate an external budget id or finance system code (i.e. 2004-213-02 or 2004-213-06) with a fiscal list code, you can start adding budgets to the fiscal list. Each budget added to a fiscal list uses the value in the Finance system code field (i.e. ABC10999) for its external budget id.
· If your external accounting system changes its Finance system code (external budget id) each year, all you need to update is the Finance system code within the Fiscal list record. The budgets linked to this fiscal list will automatically use the new Finance system code in interfaces to external accounting systems.
· These lists are used for reporting purposes only. They do not affect ordering.
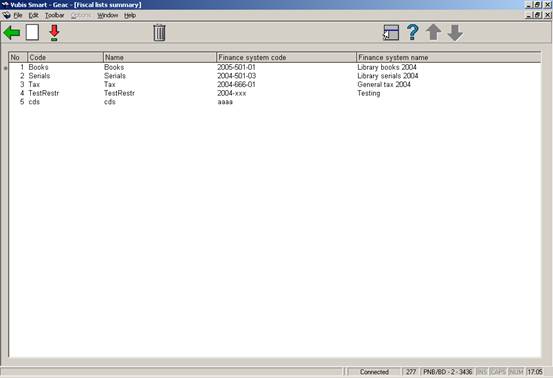
After choosing the Fiscal lists option, you are presented with an overview screen of the FISCAL LIST codes.
: use this icon to create a new list.

|
List identifier |
Short reference name (displays as part of the library budget details for each budget in this list - in AFO243) |
|
List name |
Longer descriptive name for this list |
|
Description |
Free text narrative field , used to describe usage |
|
Finance system code |
Short reference name for finance system use Enter the account number used by your external accounting system |
|
Finance system name |
Longer descriptive finance system name |
Once you have pressed on this form, the system redisplays the Fiscal list grid. From this grid you may select the newly created fiscal list and proceed with attaching budgets to it.
: this option is used to modify the list.
: select a fiscal list and click on this icon. The selected fiscal list will be deleted.

Selecting one of the items from the grid results in a detailed display of the selected list. The detailed display includes the CODE, NAME, DESCRIPTION, CREATION DATE AND CREATOR’S NAME fields. It also includes a grid area displaying one line for each budget belonging to this list.
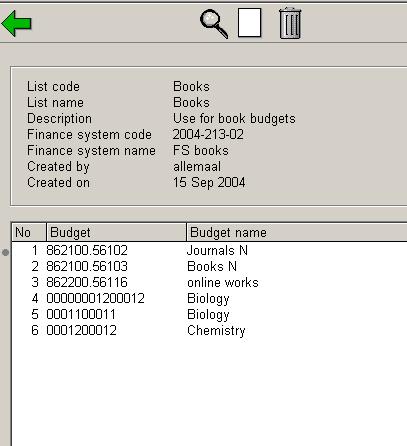
: this option is used to modify the list name field.
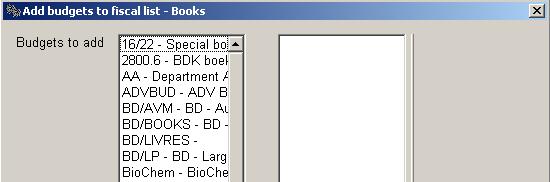
: use this icon to add more budgets to the current list
: select one or more budgets from the list and click on this icon. The selected budgets will be deleted from the list.
Distribution lists are used to create multiple partial orders during the ordering process. You can define distribution lists for commonly used ordering practices. For example, in a centralised ordering environment, a book title might be ordered according to the following pattern:
Location Quantity
BD 5
CEN 8
NOR 3
EAST 2
WEST 7
You can define a distribution list consisting of many distribution lines. Each distribution line includes the location, Ship To code, budget and quantity ordered. During the ordering process, staff may choose to apply a distribution list to the order instead of adding partial orders one at a time.
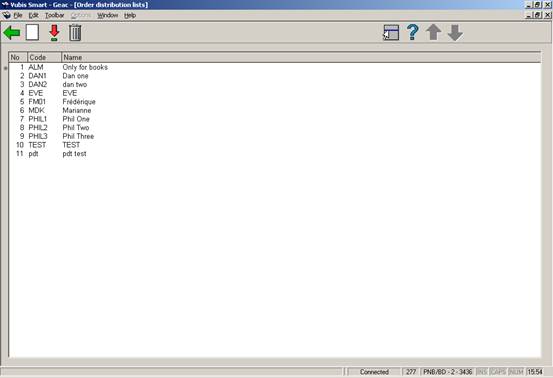
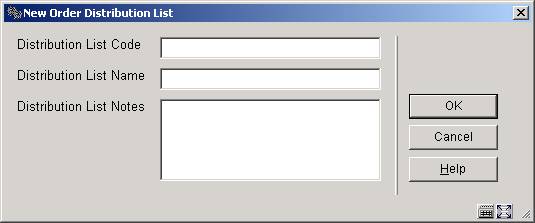
After choosing the Order distribution lists option, an overview screen of the Order Distribution List codes is presented:
: click this icon to enter the code, name and a note for a new order distribution list:
: click this icon to delete a list. You will be asked for confirmation.
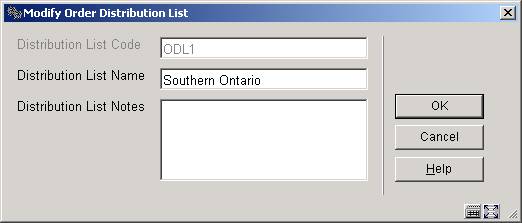
: Selecting one of the distribution lists from the grid results in a detailed display of the selected list:

The detailed display includes a header area with the general information about the list and a grid area, displaying one line for each location distribution belonging to this list. A distribution line contains the following fields: destination code, shipto code, budget and quantity.
: to add lines to the list. The form for adding a new line is displayed. The system continues to prompt you to add new distribution lines until you press .

: click on this icon if you wish to update the fields on a specific distribution line and a form similar to the one above is displayed.
: to delete one or more distribution lines from the list.
: use this icon if you wish to update the general information pertaining to the list.
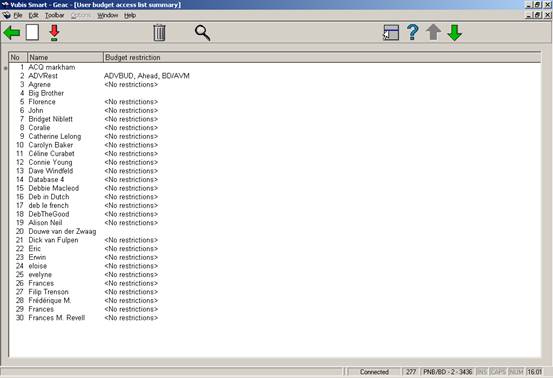
User budget access lists allow you to restrict users to creating orders from a specific set of budgets.
By default, all users have no restrictions. That is, when upgrading from a release previous to 2.4, or when adding a new user, all users will default to no restrictions. So you must set up restrictions for users if required.
After choosing the User budget access lists option, you are presented with an overview screen of the USER BUDGET ACCESS LIST codes.
: use this option to create a list for another user.

Login ID: a valid login ID
No budget restrictions: set this field if this user should be able to order from all budgets
Budget restrictions: if the user is only allowed to order using specific budgets, select the list of budgets
: select this option when you want to update the user’s budget restrictions
If this user should have access to all budgets when ordering, set the No budget restrictions field. Otherwise, select which budgets this user should be able to use.
If specific budgets are selected, the user will only be able to order material using these budgets
: deletes the selected User budget access list
:

You can set up the Acquisitions system so that individual members of staff are able to add, amend or cancel orders only for specific types of materials.
After choosing the User material type access lists, you are presented with an overview screen of the USER MATERIAL TYPE ACCESS LIST codes.
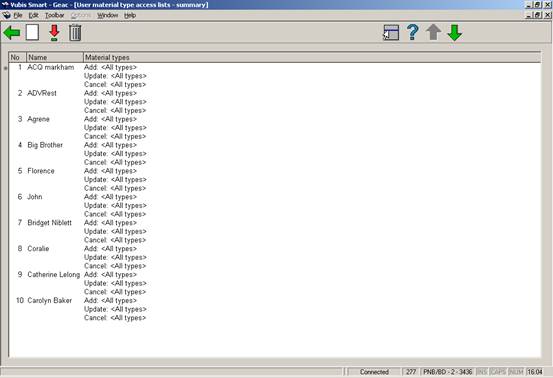
Selecting one of the items from the grid results in a detailed display of the selected list. The detailed display includes the NAME AND LIST OF ALLOWED MATERIAL TYPES for adding, updating and cancelling.
: use this icon to add users to the current list. Add information on all tabs (Adding, Updating, Cancelling)
: this option is used to modify the permissions for the selected user.
: to delete a user from the list.

This Acquisitions user is allowed to add orders for CDs and CD-ROMs only. If the user should be allowed to update all material types, set the No material types restrictions field and clear out any material types that you have added to the Material types restrictions field.
These lists are meant to support the functionality for protecting receipt of items for locations other than the local location. This functionality also allows virtual switching of the workstation to a non-local location to allow receipting of non-local items subject to user permissions.
The receipting and invoicing of items ordered for any location will be controlled by use of “receipt location” lists. Each receipt location will have a number of lists containing “valid” locations for selected material types associated with it and only items ordered for these locations and material types may be received and invoiced. The lists will be used to “restrict” the view of copies to be received / invoiced during the receipting/invoicing process of the acquisitions process.
Note
If receipt location lists are not created the receipting and invoicing process will function normally, with no restrictions applied to the data displayed during the receipting and invoicing processes.
After choosing this option an overview screen will be displayed:

: choose this option to add a new list. See section 277.9.1 for details.
: select a list and then this option to modify the location and/or material type information. See section 277.9.2 for details.
: select a list and then this option to amend the description in the various languages.
: select a list and then this option to delete the list.
: choose this option to add a new list. After choosing this option an input form will be displayed:

User location: choose a valid location from the dropdown list.
List name: enter the name of the list.
List description: optionally enter descriptions of the list in various languages.
Next you must add the valid receiving locations and/or material types. See section 277.9.2 for details.
: select a list and then this option to modify the location and/or material type information. After choosing this option an overview screen will be displayed:

: use this option to add or delete material types. See section 277.9.1.1 for more details.
: after choosing this option a list of valid locations will be presented. Choose one or more locations.
:select a receiving location and then this option to remove it from the list.
: use this option to add or delete material types. After choosing this option, the system will switch to the following screen:

: after choosing this option a list of valid material types will be presented. Choose one or more material types.
: select a material type and then this option to remove it from the list.
· Document control - Change History
|
Version |
Date |
Change description |
Author |
|
1.0 |
unknown |
creation |
|
|
2.0 |
May 2006 |
updates for release 2.4.1 build 16 |
|